latest News
Barefoot Pat's Xero Loop Variation
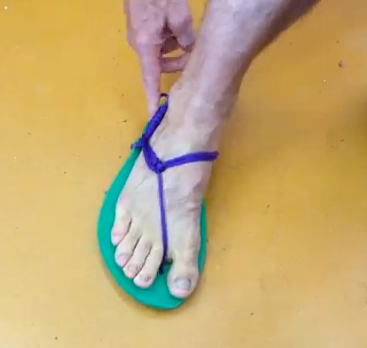
Pat made a tweak to the Xero Loop style that you may like. His video is in French (with a couple of English words tossed in, like "slip on" ;-) ) First, a few tying tips and notes: Tying the Lace knot: This is the knot we most commonly use, especially with our 100% polyester laces. The "Lace Bead": This is the smallest "knot" you can make for your Xero Shoes. Tying a Figure-8 knot: If you have our original laces with the nylon core, you'll want to use this knot. Lacing tips: The basic running sandal tying pattern Barefoot Pat's Xero Loop Variation Notice that he also found it more comfortable to move the toe hole forward about 1/4"-1/2". This shows how flexible the huarache concept is; find what's best for you and enjoy! Step-by-Step instructions coming soon!

Fitness Guru Al Kavadlo chats with Xero Shoes
I met (online) Al Kavadlo over 3 years ago and was really impressed with what he was teaching and how well he practiced what he preached. Al has been a big fan of Xero Shoes, sending us photos of him running through the streets of New York, across the Brooklyn Bridge, and performing all manner of impressive bodyweight exercises in his Xeros. Al is a master of body weight training and has put together some of the best coaching I've seen on that topic... something that we both agree every runner could benefit from. We got together thanks to Google Hangouts to have a chat. We didn't have an agenda, and didn't prepare anything in advance, and I'm sure you'll enjoy watching this conversation with Al that includes: Strength training without equipment Best strengthening exercises for runners The link between barefoot running and bodyweight exercise Can you go barefoot in New York? REALLY? A new way to bring fun -- and fitness -- into your running ... and a lot more Let us know what you think in the comments below. And check out Al's fitness products: Pushing The Limits -- one of the best books on the essential bodyweight exercises I've ever seen. Great photos, and not just because so many of them feature Xero Shoes! Raising The Bar -- everything you can do with a pull-up bar (it's a LOT). If you're more visual, then check out the Raising the Bar DVD. Progressive Calisthenics Workshop -- based on the principles in Convict Conditioning, a classic in the bodyweight strength game.

Barefoot running on Youtube - A webinar with Jon and Mel
Think you can't run an ultra-marathon? Well, think again.Maybe your limitations aren't what you imagine them to be.I just had a great chat with ultra-runners, Jonathan Sinclair and Melissa Gosse that I know you'll love, whether you ever plan to run an ultra or not.Watch the webinar and you'll learn: Do you need to do 100s of miles per week to train? What's the roll of cross-training? How much of distance running is physical vs. mental How do you deal with the mental challenges of ultra-running What diet Mel and Jon have found that helps with their training and recovery Why they run in Xero Shoes (and when they don't!) The value of barefoot running... at any distance ... and a LOT more Share what you think of this interview in your comments, below.
Get Xero Shoes for free (better than a coupon ;-) )
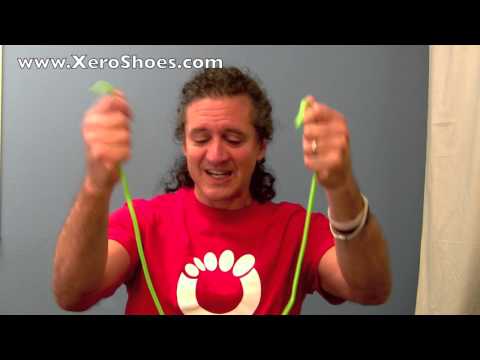
Even though Xero Shoes cost MUCH less than any similar product, especially with our 5,000 mile sole warranty, I know that for some people the price of Xero Shoes is more than they have. Well, here's a way you can get a pair for free ;-) Let us know how you do with this "magical technique." And if you know some other similar ways to get Xero Shoes, make a video and show us! ;-)

Men's Health Barefoot Running Article ... more of the same
The recent "Special Report" in Men's Health about barefoot running has inspired me to help you make a career change. You, too, can write an article about barefoot running that will appear in a major newpaper, magazine, or television show, if you do the following. Ten Steps to writing a popular barefoot running article Open with a headline suggesting that barefoot running is evil or dangerous. Ideally, use some pun about feet, or running that if the reader only saw the title, would suggest that there's no value in ever running in your bare feet. Even if your article ultimately supports barefoot running, make sure the headline suggests that taking off your shoes could lead to injury, illness, and tax audits. Follow with a sub-headline that includes a "straw man argument" about the perils of not wearing $150 running shoes.A straw man argument is one where you introduce a position that nobody holds, or nobody of any import holds, and then attack that position. For example, I don't know of any barefoot running authors or coaches that say "You'll run faster in bare feet," so the straw man argument is to say that barefooters make that claim, and then attack that claim. Similarly, a recent survey I did with barefoot coaches showed that none of us ever suggested that running bare footed was more efficient, yet many articles and even university research is now "debunking" a claim that was never made. Start with a story about someone who switched to barefoot running and got injured, and then claim that it was being barefoot that caused the injury. Ignore that 50% of runners and 80% of marathoners get injured every year. Conflate "minimalist" running with "barefoot running" and talk as if a zero-drop pair of shoes with 1" of foam is the same as running in your bare feet. Also, ignore that most "minimalist shoes" are about as minimalist as a pair of stilts. And forget that prior to 45 years ago, when the first running shoe was invented and sold, all shoes were minimalist. Quote doctors who say they're seeing more and more patients who are injured due to running barefoot. Make sure these doctors have never run barefoot in their lives. Ignore statistics: Doctors will see more patients with injuries when more people are trying something (doctors made the same claims 40 years ago when running shoes became popular and you can find articles saying that running is bad for you!). Doctors don't see patients who aren't having problems. Don't explore the doctor's statements too closely so you don't have to discover that these same doctors typically don't ask, "Are you running barefoot or in minimalist footwear," nor do they say, "Let's take a video and see if your running form could be a problem." Don't include any stories from the myriad people who've taken off their shoes, switched to barefoot, and been able to run pain-free for the first time in years. Definitely don't include stories from elderly people who have regained their balance once got out of orthopedic shoes and started using their feet again. Include some pro-barefoot info, but don't be TOO pro-barefoot. Keep the pro-barefoot info until later in the article so that if people stop reading they'll be left with the horror stories of running without motion controlled shoes. Ultimately, recommend minimalist shoes so that you don't anger footwear ad-buying companies. Suggest that switching to barefoot will be an arduous, massively time-consuming process that, maybe, will have some benefits... but probably not. To be fair, the Men's Health article is better than some. It does include some info about transitioning, even though it succumbs to the idea that you need to get a lot stronger, rather than focusing on using less effort/energy. And, I understand that if you want to sell magazines, television time, or eyeballs, it's helpful to be controversial. But there are ways to be controversial that inspire conversation and investigation, and ways to be controversial that encourages less thinking and reason. Even though, when considered in it's entirety, the Men's Health article isn't really anti-barefoot, I'm willing to bet that I'll get emails and calls from people who only read the anti-barefoot headline and first page and tell me, with a certain better-than-though feeling, "Well Men's Health said being barefoot is bad for you!" The content of this post does not constitute and is not intended to be a substitute for professional medical advice, diagnosis or treatment. Always seek the advice of a physician or other qualified health provider with any questions or concerns you may have about your health or a medical condition.

Become your own barefoot running coach
I had an intense sprinting workout 2 days ago, followed by an even more intense weight lifting workout and this morning I can barely walk. Even more, I did a minor tweak of something in my ankle which I'm noticing as I walk on my treadmill (I have a treadmill desk). As I'm walking, I have to experiment and make minor changes to my gait in order to walk with proper form and pain free.This reminded me of an old joke:"Doctor, it hurts when I do this.""Well, stop doing that!"While this is an old joke, it's important barefoot running lesson, namely:If it hurts, STOP DOING THAT.Remove the following thought from your mindFor decades now we've been told things like "No pain, no gain" (I'm assuming you remember the running shoe company that first told you that).(BTW, I'm no conspiracy theorist, but if I sold a product that contributed to injuries the way that running shoes seem to, I can't think of a better way to convince people to use my product, despite the effects they may have been experiencing when using it.)But, back to the point... When it comes to barefoot running (and walking, and hiking, and anything else), the most important skill you can develop is the ability to be your own coach. And the most important coaching skill you can learn is to experiment with different movement patterns.When it comes to running barefoot, the odds are high that if you're doing something that hurts you're doing something incorrectly. And the way to make things stop hurting is to do something differently.Becoming your own barefoot running coachWhat are some of the kinds of hurts I'm talking about? Sore calves Sore Achilles (sore anything, really) Blisters Callouses Stubbed toes Abrasion between your toes, on top of your foot, or around your heel (if you're wearing huaraches). If you're wearing huaraches running sandals, there are some "injuries" to the sandals that "hurt", like: Wearing away the toe knot Breaking the toe strap above the knot Breaking the strap by the outside ankle hole All of these can be corrected by doing something differently, by changing your gait, or your thinking.What kind of changes are we talking about? Don't reach out with your foot (overstriding), but place your foot under your body as much as possible. For some people, you'll want to try to have your feet land behind you (you won't be able to, but the cue will move your feet further back). Barefoot Ken Bob has a great line: Move your torso forward and have your feet try to catch up. Another tip for doing something different than overstriding: pull your toes up towards your knees slightly, just before you land... some people overstride by reaching out with their toes. Don't push off the ground with your toes/calves, but LIFT your foot off the ground by flexing the hip. Don't think of your foot as something you "land" on, but as something that skims across the ground at the speed you're moving. Try a different surface -- smooth hard surfaces are the best for barefoot running because they give you the most feedback about your form. But if you're on a surface that hurts to run on, try a different one. Do shorter runs. Give yourself as much time as YOU need to learn proper barefoot technique. There's no magic number of days or weeks that it'll take. It's different for everyone. Start with short runs, really short runs... like 200 yards. Pick up your cadence. Move your feet faster, without running faster. Experiment with different speeds. Some people say you MUST run at 180 steps per minute. It's not true; that's not a magic number. But the odds are good that you'll want faster turnover than you're used to. In the cold, do "loops" instead of runs. Your body can handle cold better than you think, especially if, instead of doing one long run, you go out until your feet are cold, come back and warm up, and repeat. Try landing on your feet in different ways. You're not required to land on the ball of your foot. Midfoot might work better for you. Flat footed might work better. How you land when you're going uphill may be different than downhill. Fast may be different than slow. Many of these are overlapping. If you don't overstride, you won't have to pull your foot toward you. If you speed up your cadence, it's harder to overstride and harder to use your calves too much.Do the mathMany of the problems described above are related to these equations:Excessive friction causes abrasion. Abrasion causes blisters or lace wear. Excessive friction is unnecessary for running barefoot.Using muscles more than necessary causes soreness. You can run barefoot with less muscle tension than you think.If you look at the feet of accomplished barefoot runners, you won't find blisters or callouses. If you look at the bottoms of the sandals of accomplished barefoot sandal wearing runners, you'll find no abrasion on the toe knot or the ankle hole areas.If you tested barefoot runners for calf strength, they're typically not any stronger than the average non-barefoot runner.Did I mention: Have Fun!Perhaps this is the most important coaching tip you can give yourselfIf you're not having fun, do something different until you are! Run like a 3 year old for a while: let your head lead you, let your arms flail, run in circles and sweeping arcs, make noise!I often have this thought going through my head as I run: "What can I do to make this lighter, easier, and more fun?" Give it a whirl.Good to greatA good coach can give you a workout to follow.A great coach will adjust the workout, moment by moment, based on reality.Feeling good? That'll change things.Feeling tired? That'll change things.Different location, elevation, weather? That'll change things.Let yourself become a great barefoot running coach.And let us know how it goes! Quick update: The evening after writing this post, Lena asked me, "How's your ankle?""What do you mean?" I replied."You wrote a post that said you tweaked your ankle.""Oh, right," I said, remembering. "After an hour of experimenting with how I was walking on the treadmill, it must have fixed itself, because it's fine now."The content of this post does not constitute and is not intended to be a substitute for professional medical advice, diagnosis or treatment. Always seek the advice of a physician or other qualified health provider with any questions or concerns you may have about your health or a medical condition.
Ande's Blinged out Tying #1
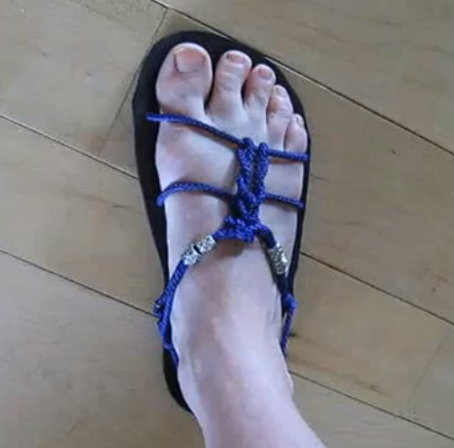
Ande has a fun, funky no-toe, no-thong tying style.(Actually, she has two, and this is the first).Note the added bling with beads

Uber-Ultra Minimal to the Max
Okay, it doesn't get more minimal than this (hence the name).Arguably, this is even more minimalist than the Ultra-Minimalist Hitch since there's no knot.Our first customer service manager, Bill Babcock, came up with this idea, and he uses it for running 100+ miles/week.To make this style, you'll need 2 "Crow Beads" (available at any craft store):First, a few tying tips and notes:Tying the Lace knot:This is the knot we most commonly use, especially with our 100% polyester laces. The "Lace Bead":This is the smallest "knot" you can make for your Xero Shoes. Tying a Figure-8 knot:If you have our original laces with the nylon core, you'll want to use this knot. Lacing tips:The basic running sandal tying patternUber-Ultra Minimal to the Max StyleStep-by-Step instructions coming soon!

Get Stronger. Run Faster.
I'm a total fitness geek. I'm always on the lookout for a new workout, a new exercise, a new challenge. I'm also an efficiency geek. I like things that give the maximum bang for the minimum buck, if you will. And, I'm a sprinter, so I pay the most attention to anything that will make my glutes, hamstrings, calves and abs stronger. Really, all runners, not just sprinters, should do the same. In fact, all the elite runners that I know (and, here in Boulder, there are a LOT that I know), also focus on strengthening those same muscles, the prime movers and the core stabilizers. About 3 months ago, I stumbled on a workout designed by Chad Waterbury. His new workout promised big strength gains in specific body parts -- you can pick which one to focus on; my interest was glutes/hamstrings -- with ultra-short workouts that you can do at home. While I've followed Chad for a while, and like his work, I wasn't in the mood to buy his new program... until a month ago when I realized I'd been so busy at work that I had been neglecting my training. And I thought that, hey, if the program didn't work, I could get my money back anyway, so why not? Here's the short version of what I did: a) I cheated and focused on 2 body parts at once -- glutes/hamstrings and calves b) I did 2 workouts every day for 28 days, following his planb) Each workout had only 2 exercises (because I was cheating, remember?). One was a body weight exercise. The other required some kind of weight (dumbbell, kettlebell, barbell... maybe a jug of water depending on your strength).c) Each workout took about 3 minutes... so I was working out for a total of 6 minutes a day. Maybe 7 on a bad day.d) I usually did one workout when I got to my office, and one before I left... but sometimes I did my second workout at home. What happened? I got stronger every day! By the end of the 28 days, I was able to do twice as many reps of each exercise compared to day 1. My measurements changed. I'll confess: my butt got 1.5" bigger (women, don't worry, that's a testosterone thing). I'll also confess that Lena noticed, and liked the change ;-) I got faster! And at the end of the 28 days, my 100m time went down by .3 seconds... even though I've done ZERO training on the track during that time. Last week, I ran a 12.2 (I'm 51), and I know that when I spend a bit more time actually RUNNING, that time will drop... which will give me a new personal best. I now have an urge to workout that's stronger than it's ever been, which feels GREAT. I look forward to a new challenge in a way that I haven't felt it years. I know I can get even stronger. And leaner. And faster. So, I started the advanced core workout yesterday and, after a few days of rest, I'm doing another round of glute/ham work. I'm a snob You may know that I very rarely recommend other products. I'm extremely picky. Perhaps a bit snobbish, even. Well, Chad's HFT (High-Frequency Training) has my recommendation. Check it out, click on the image, below:

Barefoot Sandals, Triathalons, and Speed
I got a call today from someone asking: I'm a triathlete, and I love the idea of barefoot running, or using your sandals... but how quickly can I put these on and then run with them? The time to transition between biking and running is important to me. And once they're on, will they fall off? Good questions. There are a number of "slip-on/slip-off" tying styles you can use with Xero Shoes (as well as tying styles that you have to lace up every time you wear them). When you have the tension correct, there's no problem sliding them onto your foot and having them stay securely for a run, walk, hike, yoga class, or whatever you're doing. And it takes just a second to put 'em on. I hold the knot at the top of the sandal in one hand, hold the heel strap in the other, slide my foot all the way in, and then flip the heel strap over my heel. Simple. To prove it, here's a quick video of our former Customer Service Manager, Bill Babcock, slipping on his Xero Shoes. Bill is also an ultramarathoner who knocks off 100+ miles/week wearing his Xero Shoes with an ultra-minimalist tying, slip-on/slip-off tying style. In fact, in this video, Bill is wearing shoes with the MOST minimalist tying style ever created, which you can find here

Are Barefoot Shoes Good for Plantar Fasciitis?
It is estimated that around 10% of the population suffers from heel pain caused by plantar fasciitis. Interestingly, though the condition is quite common, we don’t know as much as you might expect about what causes it and how to treat it. I often hear from runners who have switched to barefoot-style running that they have experienced freedom from the plantar fasciitis that used to bother them. In this article, I’d like to share a bit about some research that points to a reason why this may be happening. If you suffer from plantar fasciitis, you may find this opens up some new directions to explore as you seek optimal foot health. I’ll start off with some important background about what plantar fasciitis is, what seems to cause it, and how it’s often misdiagnosed. Then we’ll look at some research that points to an interesting new approach to helping people find relief. What is plantar fasciitis? On the bottom of your foot, there is a thick band of tissue, called the plantar fascia, that connects the front of the foot with the heel bone. The plantar fascia helps to support the arch of the foot and absorbs shock when our feet hit the ground. The plantar fascia can become inflamed and cause stabbing pain in the heel. Typically, symptoms are at their worst upon waking in the morning and improve once you get up and move around. What causes plantar fasciitis? Many people believe that plantar fasciitis is caused by repetitive stress. Stresses to the plantar fascia can cause small tears and these, in turn, can lead to inflammation and heel pain. What causes this kind of stress? In the literature, certain risk factors are associated with a greater likelihood that a person will experience plantar fasciitis, like doing lots of running, having a higher weight, or being in an occupation that keeps you on your feet all day. This seems to make sense. If plantar fasciitis results from repetitive stresses to your plantar fascia, those factors sound like ways of ramping up the demands placed upon your feet. But what if it’s not repetitive activities, or weight, that’s the real cause of the problem? For example, what if running form is the issue? Some ways of running place a lot more stress on your feet than others. So, the standard description of the cause of plantar fasciitis encourages us to think in terms of a simplistic picture: that repetitive stress is the input and plantar fasciitis is the output. And yet you’re about to discover that there is an important mediating factor that has a lot to do with the stresses we’ll actually experience, whatever our activity level, and how those will impact our feet. Is it really plantar fasciitis? But first, plantar fasciitis can be easily misdiagnosed. Sometimes the symptoms of PF can be caused by overly-tight calf muscles which pull on the plantar fascia. Here’s how to check: try using a foam roller and/or deeply massage on your calf muscles and see if the symptoms improve. If they do, you know that you should pay attention to releasing that calf tension. What is the best treatment for plantar fasciitis? This is where things get interesting. There is a common protocol for treating plantar fasciitis. It involves rest (to give your feet a break from whatever is thought to cause the repetitive stress damage in the first place), stretching, and the use of ice and NSAIDs (think ibuprofen) for pain. The essence here is to treat the foot pain associated with plantar fasciitis by giving the feet a rest. Recently, some researchers are proposing a different tack. Patrick McKeon and colleagues, for example, suggest that perhaps what the foot needs most isn’t rest but exercise. This isn’t to say an acute inflammation of the plantar fascia might not need time for recovery, but they argue that the core strength of the foot is the key factor that determines how likely we are to experience injuries like plantar fasciitis in the first place. In other words, greater foot strength is the key to greater foot health, both when it comes to plantar fasciitis as well as with other repetitive stress injuries, including those typically associated with running. A clinical trial backs this hypothesis up. It found that strength training exercises for the foot and ankle resulted in better outcomes than stretching alone for those suffering from plantar fasciitis. Barefoot shoes and plantar fasciitis So what does this research have to do with barefoot shoes? Barefoot shoes (sometimes also called minimalist shoes) are designed to let your feet move as naturally as possible, as they would when walking barefoot. Barefoot shoes have zero heel-to-toe drop (also called “zero drop”), meaning the heel and forefront are level and the sole of the shoe is completely flat. In comparison, typical running shoes come with things like arch supports, thick padding, and elevated heels. Wearing “supportive” shoes keeps your feet from moving the way they ordinarily would. And guess what? Immobilizing your feet, which happens with arch support and stiff shoes, can make your feet weaker. Research by Katrina Protopapas showed that adding arch support in the shoes of healthy people reduced their foot muscle size and strength by as much as 17% in just 12 weeks. Conversely, when your feet are allowed to move, they can get stronger. Research by Dr. Sarah Ridge and others have shown that walking in minimalist shoes indeed strengthens the foot as much as doing a foot exercise program (And, by the way, she says Xero Shoes should give you the same benefits as the shoes used in her study.) So we can put these two ideas together: one group of researchers says strengthening the core foot muscles will help avoid injuries like plantar fasciitis. Another says walking barefoot (or in minimalist shoes) is effective in strengthening the muscles of the foot. What’s the conclusion? It looks like the evidence suggests barefoot shoes (or walking in bare feet) could be helpful for avoiding plantar fasciitis pain. Here I want to point you to just one more piece of research. It reports on a case where barefoot running was successfully used to treat plantar fasciitis in a female athlete. I know; it’s just one case. There is more research needed to confirm barefoot running (or walking) as a way to prevent or treat plantar fasciitis. But the evidence so far is encouraging. If you have ever developed plantar fasciitis, it is certainly worth looking into. If you’d like to try out wearing shoes that are designed to let your feet and toes move naturally, find your pair of Xero Shoes right here. The content of this post does not constitute and is not intended to be a substitute for professional medical advice, diagnosis or treatment. Always seek the advice of a physician or other qualified medical professional with any questions or concerns you may have about your health or a medical condition. Common questions you may be wondering about going barefoot I’ve been talking with people about going barefoot for a long time. I know there are a couple of common questions that come up. Just in case, I’m giving some brief answers here (and a pointer to where you can find more information). Are barefoot shoes really the same as going barefoot? Obviously, they aren’t exactly the same. When you wear shoes, you have a layer between you and the ground. You do lose something here; we all know that irreplaceable feeling when we kick off our shoes and feel our bare feet on the green grass. But there are downsides to bare feet. They don’t offer you much protection on rough or sharp surfaces and they don’t do much for you in the cold. Barefoot shoes are designed to get you as close to the barefoot experience while still providing protection to the foot. If you want barefoot running shoes (or any kind of barefoot shoes), just keep in mind what you should be looking for. Dr. Irene Davis defines barefoot, or minimalist shoes with these characteristics: They’ll have a wide toe box to give your toes plenty of room to move, splay, and breathe. They are zero drop, meaning they won’t have an elevated heel which can negatively impact posture. Barefoot shoes do not have unneeded cushioning. (Research from Dr. Christine Pollard shows, much to her surprise, that cushioning does not actually reduce impact forces.) Barefoot shoes won’t have unnecessary arch support. (Research from Katrina Protopapas shows that adding arch support to the shoes of healthy athletes reduced foot strength and muscle mass by as much as 17% in just 12 weeks.) They will have a thin sole that allows both flexibility and ground feel. The end result is that your feet will be moving as you walk and run, using and therefore can strengthen the muscles of your feet. If I’m interested in starting to walk barefoot or in barefoot-style shoes, how should I get started? The short answer is that you begin slowly and listen to your body. If you’re willing to listen, the feedback you’ll get from your feet will teach you how to walk in a natural, pain-free way. Think of it like going to the gym after a long break – you don’t do 8 hours of bench presses. You do one set, see how you feel the next day, and as your body tells you it can handle the load you add reps, or weight, or, eventually, sets. Use that same attitude and strategy when switching to minimalist shoes. If you want to maximize your chances of beginning well, you’ll want to have a look at our post on how to walk barefoot.

Pronation and barefoot running
Whenever we're selling Xero Shoes at a public event, a few people will come up to our booth, examine our barefoot sandals, and claim (with a strange tone of almost arrogance), "I can't wear these. I pronate."Sometimes they'll pull out the third party endorsement, "My doctor says I pronate." Or the less-convincing, "The shoe store did gait analysis on me and said I pronate."It's as if they expect me to say, "Oh, my gosh! That's horrible! I would never argue with an actual doctor or, even more, a 23-year old who works at a shoe store that sells 'motion-controlled' shoes! You totally can't wear Xero Shoes, then. In fact, I'm amazed you were able to walk over to our booth!"Instead, I bite my tongue for a second (so I don't say something incredibly sarcastic), and then say, Pronation is not an issue. First of all, many world-class runners pronate more than you ever will. Pronation is part of the natural spring-mechanism of the lower leg. Now, hyper-pronation (showing weakness) *might* be a problem, but it rarely is. And... When you run with barefoot style and land on your mid-foot or forefoot, it's much less likely that you'll pronate at all, since those ways of landing usually put the foot and ankle in a strong position when you land. But now I have something else to add to my "pronation isn't evil" arsenal... SCIENCE!Aarhus University in the Denmark just published a study in the British Journal of Sports Medicine called "Foot pronation is not associated with increased injury risk in novice runners wearing a neutral shoe."What I LOVE about this study, reported at ScienceDaily.com, is that it studied almost a thousand runners for an entire year. That's a good amount of data to work from.And, in short, what they discovered is that putting runners in non-supportive shoes did not increase their chance of injury (and this is with them NOT switching to a mid-foot or forefoot landing, which arguably reduces their pronation).Says Rasmus Nielsen, the PhD student who led the study, "This is a controversial finding as it has been assumed for many years that it is injurious to run in shoes without the necessary support."My addition to that would be, "Well it was 'assumed' for many years because the companies making motion-control shoes TOLD us that and we believed it."Now, admittedly, the study is not the be-all-and-end-all studies about pronation. Even the researchers say that they "still need to research the extent to which feet with extreme pronation are subject to greater risk of running injury than feet with normal pronation." And, I'm going to contact Mr. Nielsen and suggest he look at barefoot running in the future.But, I'm never one to complain when another nail is added to the coffin of, well, foot coffins ;-)The content of this post does not constitute and is not intended to be a substitute for professional medical advice, diagnosis or treatment. Always seek the advice of a physician or other qualified health provider with any questions or concerns you may have about your health or a medical condition.